 I still had one more major wood working job left on the lower hull that Ive been blowing off for a few months now, and that was finishing the companion way from the salon to the cabins below. In order to get the 12,000 BTU air conditioner installed along with the associated wiring, I had to get the companion way ( st
 air way) completed.
This is another busy area of the boat. The DC electric passes from the engine room to the helm via conduit and a junction box in the companion way. This includes the 2/0 cables from the battery bank, the main engine and generator wiring harnesss, the bilge pumps controls, high water alarms controls and whatever other DC wires I can conjure up. I installed six one inch conduits, two 3/4" conduits, and some 1/2" conduits from this junction box to the helm in this tight space.
The 12,000 BTU air conditioner will also reside in the companion way underneath the stairs. This 12000 BTU air conditioner is keel cooled and will be for the sleeping cabins only. Another marine air conditioner is in the lazarette, and will service the wheel house and salon. The stairs you see in these pictures are plywood stairs that Im using for construction. The final stairs will be made from Cherry, and will be closed stringers and risers ( with ventilation). The important part of the stairs you see in these pictures, and along with the final stairs, is that the stairs are hinged for quickly gaining access underneath the stair case. The hinging of the stairs is another one of the things I got right on the build and have proven to be fantastic in regard to getting things done quickly in this area. Along with the air conditioner, the ducts for the forward cabins will rise from the air conditioner via the companion way cabinet on its way to the utility chase that is framed between the ceiling the the hull liner.
The vent and fill manifold for the starboard water tanks are also accessed from behind the companion way cabinets via access panels.
The overboard clothes washing machine discharge piping along with the half bath sink above, and the sump discharge for the air conditioner leave the boat from this area. Just to make things complete, I installed two spare one inch above the water discharge points, and one more 1 1/2" above the water discharge point in this area. All of this is accessed from either underneath the stairs, or from inside the companion way cabinet.
Once you come down the companion way stairs, you land in the area where you either continue straight to the kids cabins dressing room, or you turn left to enter the master cabin. Since the o
 utboard area of this landing was not much use, I decided to add shelves go get more storage. The shelves are fixed and have fiddles fixed to them. I have a vision of these shelves being used for can goods, but time will tell just how they evolve. I know they will need another bar going across the opening to hold things in place, but Ill wait on building that until I see what everyone wants to use them for.
The cabinet on the outboard side of the companion way came about as a way to hide the junction box and air conditioning duct work. I created two shelves in this cabinet plus sunk the bottom of t
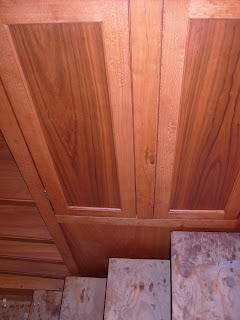 he cabinet to allow storage of large bulky items. This will be a large item cabinet. Because of the hinge stairs, and wanting to keep the stair case width, I built these doors as a flush style vs the overlay style Ive built on the rest of the boat. The flush style is more challenging to build as the door must be fit in to the opening and all the reveals need to be consistent for the door to look good. Since the humidity has been high here lately, I gave these doors a 1/6" reveal. The doors are frame and panel construction using Cherry wood. When all is said and done, and the final stairs are installed, I want no more than a 3/8" gap between the hinged stairs and the companion way cabinet and opposing wall. This is why I went with the flush door method, and is also why Ill have to use drilled finger pulls ( holes ) to open the cabinet doors. I want this area to be easy to navigate down with no snags or things to bump against. I paid particular attention, using a plumb bob and good layout, to make sure these cabinets were square and plumb with the bulkhead that the steps will be hinged to. It is important to me that the steps swing up smoothly and do not rub the cabinets and wall given the tight gaps I want to hold on the casework.
I have two coats of satin urethane on everything so things should be protected for the rest of the build. I can now install the keel cooled air conditioner and check another item off of the list. This was a fairly large wood working job, and I have over a week in getting it completed. The last wood working projects for the lower hull are building of the passage doors and building the finish stairs for the companion way.


.jpg)


